
Outlook provides convenient options to quickly set up automatic Out of Office (OoO) replies for when you are not available, along with rules to forward your email to your colleagues (or just a different email).
Let’s take a look at how we can set up automatic replies and rules in Outlook Desktop and Outlook for Web.
Setting up OoO replies and rules in Outlook Desktop
1. In Outlook Desktop, click File > Automatic replies
2. Check the radio button before Send Automatic replies
3. Check Only send during this time frame and choose the time
4. Write an autoreply message in the text box below. Make sure to create a message for people both Inside your organization and Outside your organization
Creating rules in Outlook Desktop
1. In the Automatic replies window, click on Rules > Add rule
2. To send an autoreply to everyone who emails you when you’re out of the office, leave the From field blank
PS! Automatic replies will get sent to everyone – including junk mail and newsletters. To avoid this from happening, click the radio button before My contacts only
3. Add your email to the Sent to field, and check the Sent directly to me and Copied (Cc) to me boxes
4. Check the Forward box under Perform these actions
5. Type in your colleague’s email address or shared email
TIP! If you click on the To box, you get a list of emails in your organization
6. Click OK
7. Make sure the checkbox under Status is checked, then click OK to close the window
8. Click OK on the automatic replies dialog box. You’re all set!
Turning off autoreplies/rules in Outlook Desktop
1. In Outlook Desktop, click File > Automatic replies
2. Check the radio button before Do not send automatic replies. If your replies are already active, simply click on Turn off
3. Click Rules and uncheck the box before the rule you had created
Setting up OoO replies in Outlook for Web
1. Click on the Gear (Settings) icon on the top-right corner of the screen
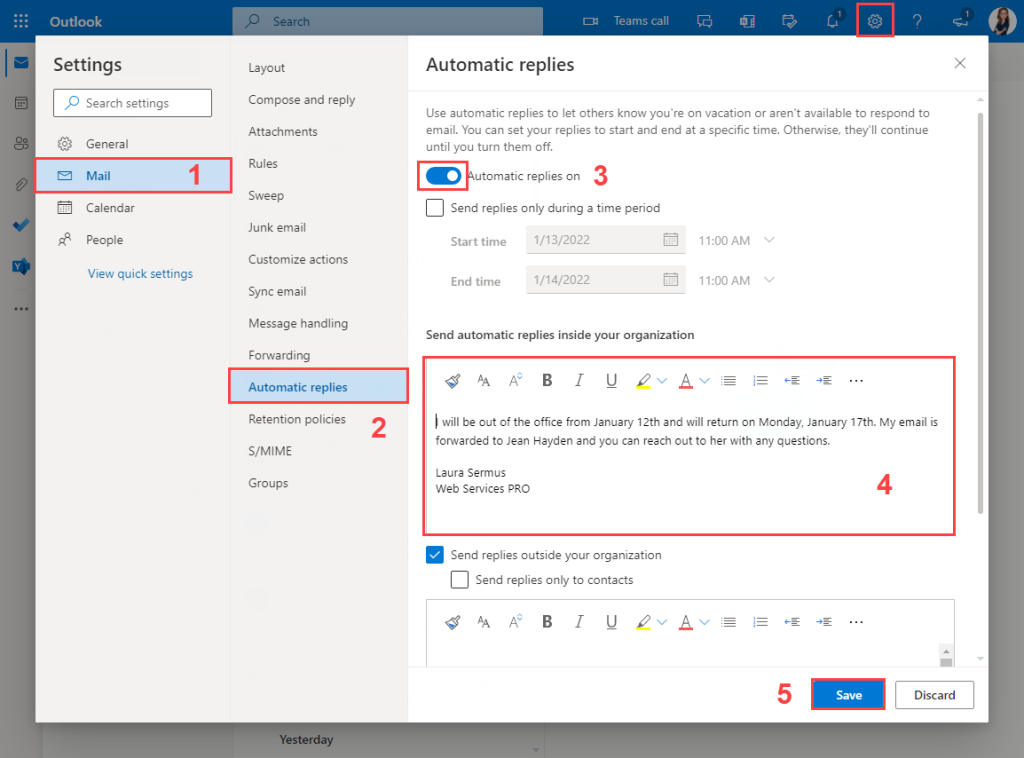
2. Click View all Outlook settings
3. Navigate to Automatic replies > Turn on automatic replies
4. Check the box before Send replies only during a time period and specify the dates and times during which the automatic replies will be sent
5. Type in your replies in the Send automatic replies inside your organization box
6. Check the box before Send replies outside your organization, and Send replies only to contacts if you don’t want your automatic replies to go out for every incoming email
7. Click Save
Creating rules in Outlook for Web
1. Click on the Gear (Settings) icon on the top-right corner of the screen
2. Click View all Outlook settings
3. Navigate to Rules > Add new rule
4. Type in your rule name (e.g., Vacation 2022)
5. Click on Select a condition
6. Choose To and type in your email address in the recipient box
7. Click on Select an action and choose Forward to (keeps a copy in your inbox) or Redirect to (doesn’t keep a copy in your inbox)
8. Type in your colleague’s or your personal email address
9. Check the Stop processing more rules box
10. Click Save
Turning off autoreplies/rules in Outlook for Web
1. Click on the Gear (Settings) icon on the top-right corner of the screen
2. Click View all Outlook settings
3. Navigate to Mail > Automatic replies and press the toggle button next to Automatic replies are on
4. To turn off rules, navigate to Mail > Rules and toggle the blue button next to your rule